If you’re new to the challenge of hiking the Grouse Grind in Vancouver, you must know these tips. As a personal trainer that has taken many groups of people up the trail, I’ve put together these points based on my own personal and many first timer’s experiences.
Part 2 of “Top 10 things you must know before you hike Grouse Mountain”
5. Things missing from the Grouse Grind (which is okay if you know ahead of time)
a) Missing: Bathrooms
One wouldn’t expect to see port a potties on a “regular” 3 hour hike, yet on some of the longer hikes it ispossible to duck into the bushes, off the beaten path, as it were, to do your business. It happens.
On the Grouse Grind, this is NOT a possibility – it’s just too busy! The switchback trails are relatively narrow and carved out of the side of the mountain, so stepping far enough off the trail to…you know…could be a dangerous maneuver.
Tip 5a: Use the bathrooms located in the Grouse Mountain pay parking lot before you go. Even if you think you don’t need to!
b) Missing: Obvious NO DOG alerts
Dogs are not allowed on the gondola and hiking down is frowned upon, so leave your pooch at home. When your furry personal trainer always accompanies and motivate you on your trek (plus it’s great exercise for them – Shadow loves hiking the Stawamus Chiefs) and you arrive only to discover that this isn’t allowed, it’s frustrating. Parking lots offer very minimal shade and it can get extremely hot on a sunny day, so keep your pets safe and happy, unless you’re comfortable leaving your trunk and doors wide open with a giant kiddie pool for them to lay in and drink from. The BCMC trail is less busy and structured differently, so if you are looking for an adjacent hike (and willing to go up and down), bring baby on that hike instead.
Tip 5b. Do not bring your dog on the Grouse Grind
c) Missing: Spikes that point uphill
Kidding. Hiking down the Grouse Grind is frowned upon. I’d like to say “forbidden” but the truth is, there are times when one needs to say “this is too much, and for my safety, I need to turn around and go back down.” However when you get to the top of the Grind, there IS a very large, brightly coloured sign that tells hikers NOT to travel down the Grind. The type 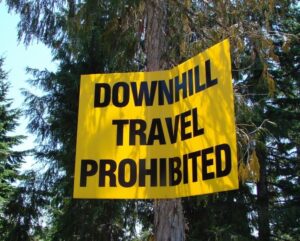 of people that typically WANT to hike down the Grind are looking for extra exercise and due to the steep incline of the stairs, they descend almost as quickly as they try to run up – jumping down, bounding from step to step. Now imagine yourself as a shaky beginner, focusing on moving forward and looking up to see someone above you, looking slightly annoyed and brushing down past you. Secondly, running or jumping down the steps increases the rate of erosion of the Grouse Grind trail. Grouse Mountain has invested a lot of money and time to maintain the upkeep of the trail and build new stairs and keep the public safe. This trail is FREE to hike up, so making sure that we’re not part of the degradation of the trail may help keep it this way for longer. FINALLY – if you love your knees, go upwards only. Due to the incline of the ascent, well, you know the descent has the same angle. This, in combination with gravity puts a large amount of stress on the muscles, tendons and ligaments surrounding the knee joint (and hips and ankles) as you are repeatedly performing an eccentric contraction, and your quads tend to get overworked, and your dominant leg (most people will want to land on their right or left leg first) works the whole time…there is a high probability that your knees will be hating you the next day.
Tip: Hike up only. If you must turn back, respect hikers by yielding, alternate landing legs, use hand holds and take your time.
4. How do I get down the Grouse Grind? Gondola!
Bring money! There are three ways to get down: hiking down (it’s legal but as point 5 states, you’ll get a lot of nasty stares), hiking down the BCMC trail and taking the Gondola. The second trail down is more leisurely, a bit quieter and may add an extra 15 – 20 minutes to the time it took you to come up the Grouse Grind.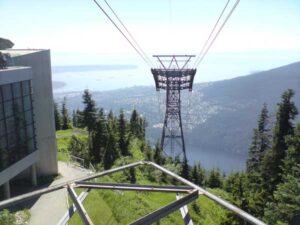
But the easiest and funnest way to get down is to take the gondola (if you are seriously afraid of heights, you may want to check out this video just so you have an idea of what the ride is like, and if you don’t know my sense of humour, please bear with me). The ticked ride cost is $10 (they will take credit card, debit card and cash, though sometimes there is a cash only line and it moves quicker than the credit card lineup).
There is a nice cafe at the top of Grouse Mountain where a cold beverage, coffee or smoothie can be purchased after finishing the Grind. Heck, you could make an afternoon of your day, hit the restaurant, pub and have a refreshing drink and something to eat.
Tip: Bring your wallet or at least $10 (HST already included) to take the gondola down.
3. What how much water and food should I bring on the Grind?
In a perfect world, if you’re reading this a few days or the day before doing the Grouse Grind, start hydrating now. It will make the climb easier as you’ll be functioning on all cylinders (assuming you eat well etc.). Start with a giant glass of pure water and try to get in your 6 – 8 glasses 24 hours before you start.
I guarantee you will sweat. Guarantee! To replenish the fluid loss, carry a water bottle. “How much” depends on your experience working out with, and without, water. I know individuals who will finish the Grind in under 40 minutes and part of that great time is not bothering to stop and have a drink; some people NEED water after the first 15 minutes. As a recommendation for a beginner, it’s always better to have extra water left over when you finish, than to hit the ½ way mark completely parched. 1 – 1.5 litres if you’re not sure what your needs are. Today, I’m comfortable bringing an 800ml container and often have some to spare when I’m done. As for electrolyte replacement drinks like Gatorade, studies show that there is benefit if the activity is over 1.5 hours. At the end of the day, drink as much as you can comfortably handle, remember how you feel (weighed down, needed to pee, energized etc…) and modify from there.
As for food and snacking on the Grind, remember, the average person takes 1.5 hours so if you feel that snacking is extremely important for optimal performance, then something like trail mlx and/or fruit will be okay. Leave the picnic baskets or anything that requires cutlery at home. There are also no garbage cans on the trail.
Tip: bring 1 – 1.5 litres of water if it’s your first time. Take out any garbage you bring in with you.
2. What to wear on the Grind – clothes and a towel
I’ve done it in jean shorts and a cowboy hat, but I don’t recommend it. If you see someone in a chicken suit, you’d better believe they lost a bet…and badly. Due to the misinformation (or just lack of), combined with the popularity of the Grind you will see everything from tight jeans, to dress pants, to (oh dear) skirts. This is an intense hike so you’ll get a little dirty and sweaty, so even your absolute favourite Lululemon’s that show off your assets “just so” might be better left for the gym or beach. On hot days you may see a few shirtless men go by, but on the gondola ride down, they pack you in pretty tightly, so guys, bring a shirt (and everyone…deodorant). If you are a heavy sweater, be aware of a possible chill at the top (especially if it’s a cloudy day, and you’re hanging around at the top a bit), so a spare dry top to change into or windbreaker can be an asset. I have this weird condition where I practically go hypothermic after intense exercise, regardless of ambient temperatures so if you, or your girlfriend(s) are “always cold,” keep this in mind!
Tip: wear breathable, moisture wicking, unrestrictive clothing, and bring a small hand towel for sweat (and maybe dirt).
1. What to wear on the Grind – footwear
This is sort of a tie with #2, but even more important than athletic clothing and water (you could always ask someone for a sip) is footwear! In addition to jeans and miniskirts, I have seen: flip flops, sandals, dress shoes and platform heels. While I don’t personally mind what you chose to put on your feet (unless this means you’re going to slip and endanger yourself and those around you), I can’t imagine that it’s very comfortable, let alone safe. In tip 8, I mentioned that the Grind is mostly “stairs” and switchbacks, there are also some sections where the steps are like dusty rounded boulders and some are jagged rock edges. Dirt, dust and small rocks can make some sections “slippery” and if there is rainfall / runoff, then expect slippery sections. While hiking boots are not mandatory, a trail shoe with an aggressive “grid” that provides good traction is the best way to go.
Tip: wear your favourite athletic shoe (aka, don’t use the Grouse Grind to break them in) with a good tread on the bottom.
Here are a few tips in video format, if you really hate reading – enjoy!
Tips on water and shoes
Tips on pre-hydration
So there you have it – the top ten things you need to know (did you miss tips 10 – 6?) before you do the Grouse Grind, in beautiful Vancouver, BC. We love our hikes and sometimes take them a little too seriously, but all in the pursuit of fitness, health, being outdoors and feeling on top of the world! As daunting as it may seem to a beginner, if you’re prepared, I know you can finish it, emerge victorious and maybe even think, “heck, I think I could do this 4 or 5 minutes faster next time! Let’s go again next week!” Join us on our annual Grouse Grind Challenge, a 5 week program that takes you up the Grouse Grind, in a supportive and motivational environment and encourages you to hit your personal best ~ contact us at info@lephysique.com to join in!

